This is an article aimed at beginners and there's lots of screenshots included. The gist is that you have to install less preprocessor, add UI-kit in dependencies, and edit App.vue to include it. There is also a section on how to use the theme used in the uikit website.
First, install the vue cli 3.0. It has a UI server, and is really nice.
Install cli 3.0
If you have been using vue-cli 2.0, go ahead and uninstall it. After that, let’s install vue-cli 3.0.
Install Vue CLI 3.0:
yarn global add @vue/cli
# or use npm if you prefer that
npm install -g @vue/cli
Check version with vue --version
Create a new project
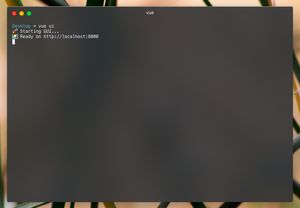
cd to the directory where you want to create your project folder. Then run vue ui.
This starts a the new GUI for vue cli 3.0. It’s super awesome, btw.
Click on create.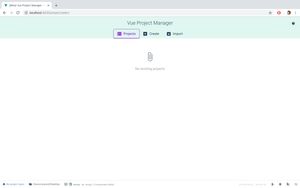
Select your package manager. I chose yarn, but you can use npm too.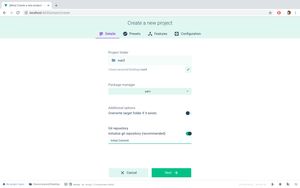
Select the manual preset.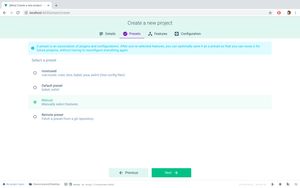
Select Less in preprocessor. The Sass/SCSS shown in the screenshot is wrong.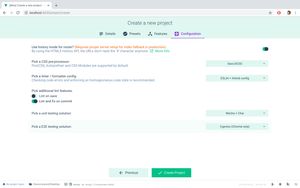
Now you can select all the features you want, and they’ll be automatically installed and setup! CLI 3 magic ✨! Wait for vue-cli to finish setting the project.
Add UiKit
Now open the dependencies tab in the sidebar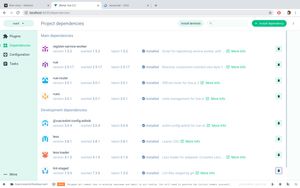
Select and install Less if it isn't already installed. You can also manually install it with npm install --save-dev less-loader less css.
Now click 'Install dependency', and Type and select uikit.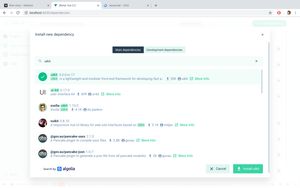
Great! now we have Uikit installed. Let's edit App.vue to use Uikit.
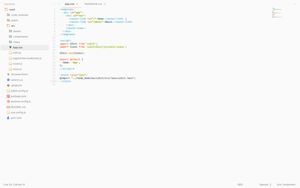
Edit App.vue
App.vue is in the src folder.
Add these lines inside the script tag.
import UIkit from 'uikit';
import Icons from 'uikit/dist/js/uikit-icons';
UIkit.use(Icons);
and add this line inside the style tag.
@import "../node_modules/uikit/src/less/uikit.less";
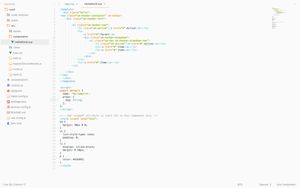
Your src/App.js should look something like this. I removed the default content inside the style tags.
<template>
    <div id="app">
    <img alt="Vue logo" src="./assets/logo.png">
    <HelloWorld msg="Welcome to Your Vue.js App"/>
    </div>
</template>

<script>
    import UIkit from 'uikit';
    import Icons from 'uikit/dist/js/uikit-icons';
    UIkit.use(Icons);
    export default {
        name: 'App',
    };
</script>

<style lang="less">
    @import "../node_modules/uikit/src/less/uikit.less";
</style>
We're all set! The next section is editing the HelloWorld component to test everything worked correctly.
Edit HelloWorld.vue
Replace the template tag in src/components/HelloWorld.vue with html that uses UiKit.
I just copied the cards template from UiKit website (https://getuikit.com/docs/card#style-modifiers) and removed the included styling.
Your src/components/HelloWorld.vue file would look like this now.
<template>

<div class="uk-child-width-1-3@m uk-grid-small uk-grid-match" uk-grid>
    <div>
        <div class="uk-card uk-card-default uk-card-body">
            <h3 class="uk-card-title">Default</h3>
            <p>Lorem ipsum dolor sit amet, consectetur adipisicing elit.</p>
        </div>
    </div>
    <div>
        <div class="uk-card uk-card-primary uk-card-body">
            <h3 class="uk-card-title">Primary</h3>
            <p>Lorem ipsum dolor sit amet, consectetur adipisicing elit.</p>
        </div>
    </div>
    <div>
        <div class="uk-card uk-card-secondary uk-card-body">
            <h3 class="uk-card-title">Secondary</h3>
            <p>Lorem ipsum dolor sit amet, consectetur adipisicing elit.</p>
        </div>
    </div>
</div>

</template>

<script>
export default {
    name: 'HelloWorld',
    props: {
    msg: String
    }
}
</script>

<!-- Add "scoped" attribute to limit CSS to this component only -->
<style scoped lang="less">

</style>
Start the development server
Back the the cli GUI. There is a tab called 'Tasks'. In it, select 'Serve' and click 'Run Task'. This starts a development server. Alternatively, you can run yarn serve or npm run serve and get the same thing going.
Head to http://localhost:8080/ . If everything went well, you would see something like this.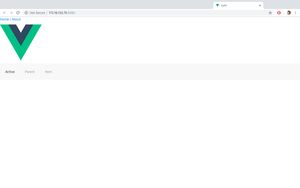
Adding UiKit styling
You might notice that the styling on our development page is not exactly like the demos shown in Uikit website. That's because they're using a custom theme. Let’s change that.
Go to the Github repo for UiKit website. https://github.com/uikit/uikit-site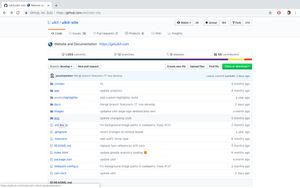
less. We need both of them.
In your src/assets folder, create 3 new folders.
cd src/assets
mkdir fonts images less
Copy the highlight.less and theme.less folder into the folder named less.
cd less
wget https://raw.githubusercontent.com/uikit/uikit-site/develop/less/highlight.less
wget https://raw.githubusercontent.com/uikit/uikit-site/develop/less/theme.less
There is some editing we need to do on the theme.less file.
Change the first line:
@import "../assets/uikit/src/less/uikit.theme.less

to

@import "../../../node_modules/uikit/src/less/uikit.theme.less";
Change the second line from
@import "highlight.less";
# to
@import "./highlight.less";
Below these lines in theme.less, you can see some fonts being included. Let’s get them.
cd ../fonts
UK="https://getuikit.com"
wget $UK/fonts/ProximaNova-Light-webfont.woff2
wget $UK/fonts/ProximaNova-Light-webfont.woff
wget $UK/fonts/ProximaNova-Reg-webfont.woff2
wget $UK/fonts/ProximaNova-Reg-webfont.woff
wget $UK/fonts/ProximaNova-Sbold-webfont.woff2
wget $UK/fonts/ProximaNova-Sbold-webfont.woff
wget $UK/fonts/montserrat-600.woff2
wget $UK/fonts/montserrat-600.woff
wget $UK/fonts/roboto-mono-regular.woff2
wget $UK/fonts/roboto-mono-regular.woff
Further down below in theme.less, there is another line which reads
url("../images/section-background.svg")
Let’s that svg as well.
cd ../images
UK="https://getuikit.com"
wget $UK/images/section-background.svg
All set!
We are all set! Just update your App.js styles section to include our new file.
<style lang="less">
@import "../node_modules/uikit/src/less/uikit.less";
@import "./assets/less/theme.less";
</style>
And restart your dev server. The styles should be same as the UiKit website now.
Conclusion
You can find my Github repository created by following this tutorial here: https://github.com/zeroby0/vue-uikit-webpack-vuecli3
A demo of a site built with that is here: https://vue3-uikit.netlify.com/
Feel free to drop a comment if you are stuck and need help 🙂.